To print this issue, either press CTRL/CMD + P or right click on the page and choose Print from the pop-up menu.
Click on images to enlarge.

Crop Conditions
 Planting is really getting going, now that the weather has warmed up. Potatoes are going in, and lots of lettuce and brassicas are being planted out, and early carrots are even being direct-seeded. The hot crops—tomatoes, peppers—are almost ready to go out but most folks are waiting a few more days to get past. Farm stands are getting dusted off and set up, and the first asparagus is out and selling as quickly as it can be harvested!
In breaking food safety news, the FDA released its Final Rule on Pre-Harvest Agricultural Water this afternoon. We haven’t read it closely yet, but it finalizes the requirement that farms subject to inspection under the Rule must conduct a written water assessment at least once annually and implement corrective and mitigation measures if necessary. Compliance dates are based on the size of the farm—the largest farms (those averaging more than $500,00 in the last 3 years) will have to begin complying in April 2025.
Pest Alerts
Alliums
Onion maggot adults have started to emerge in MA, based on the GDD model (first emergence at 390 GDDs base 40°F). Flies will lay eggs at the base of allium plants and the maggots will feed on the roots, stem, and developing bulb. With limited labeled pesticides, crop rotation is key for managing this pest.
Allium leafminer adults have been active for a week or more across most of the state, and should be just emerging in Berkshire Co. now. Adults begin emerging at 350 GDDs base 1°C (see Table 1). Adults will lay eggs in any allium crop with green foliage currently in the ground, but few infestations have been reported in garlic. Onions that were planted and covered already should be safe, as long as they are in a field that was not infested with ALM last fall. Scout uncovered plantings for rows of small white oviposition marks, often at the tips of leaves. Conventional growers can apply dinotefuran (e.g. Scorpion, Venom), cyantraniliprole (Exirel), or spinetoram (Radiant), starting up to 2 weeks after feeding/oviposition marks are detected. All of the above materials have systemic or translaminar activity and will be effective against larvae. Include a surfactant to limit runoff and maximize uptake, unless labels prevent it. Organic growers should apply Entrust at 6 oz/A + M-Pede at a 1-1.5% v/v solution, two times, 2-4 weeks after first detecting ALM in a crop.

Asparagus
We are seeing frost damage from last week’s low temperatures in asparagus in some locations, pushing the first harvest back a few days. Frost -damaged spears will be distorted and bent and will turn soft and start to rot. Subsequent growth will be fine. The new frost-tolerant varieties ‘Guelph Millenium’ and ‘Guelph Eclipse’ are reported to have withstood the low temperatures well.
Brassicas
Cabbage root maggot is expected to reach peak flight in most of the state later this week. Peak flight occurs at 452 GDDs base 40°F (see Table 1). Cover new brassica plantings with row cover unless the field was infested with CRM last year, or plan to apply an insecticide at planting if you know you have high CRM pressure. Coragen (chlorantraniliprole) or Verimark (cyantraniliprole) may be applied at planting and Radiant (spinetoram) or Entrust (spinosad) may be applied to leafy (not root) brassicas at planting and in up to two additional applications to seedlings.
Flea beetles are starting to emerge from overwintering sites at field edges or high residue areas. Row cover or insect netting applied before crops become infested will exclude flea beetles, or make sure you have insecticides lined up to start applying when populations rise (see our Flea Beetle Management article in the May 18, 2023 issue of Veg Notes for recommendations of conventional insecticides). Spinosad (e.g. Entrust) is the most effective OMRI-listed material. Kaolin clay (e.g. Surround) will also deter flea beetles but has to be reapplied to protect new growth or after rain.
Miscellaneous/Multiple Crops
We are seeing lots of poor plant growth in propagation houses, which is not uncommon in the early season when weather is cool and cloudy. We see this in transplants grown in compost-based potting mix most commonly, since it is difficult to maintain consistency when using a complex biological soil amendment. Quality control issues can lead to nutrient imbalances, ammonium toxicity, and/or excessive salts. If you have struggling transplants, you can submit a potting mix sample to the UMass Soil Lab for a greenhouse media test, submit a plant tissue sample for nutrient analysis (not currently offered at UMass, so we recommend using the UMaine or Penn State Soil Labs), and/or contact your potting mix supplier to report problems.
Aphids: We are continuing to see aphids in greenhouse and high tunnel crops, particularly in peppers and tomatoes. Common species include green peach aphid (Myzus persicae) and potato aphid (Macrosiphum euphorbiae), but melon/cotton aphid (Aphis gossypii) and foxglove aphid (Aulacorthum solani) are also frequently found in tunnels and greenhouses. Aphid populations grow rapidly, so it is important to scout regularly to catch infestations when they just start. When scouting, make sure to inspect plants thoroughly, checking upper and lower leaves and both the top and bottom sides of leaves. Leaf curling and the presence of white dust-like material on leaves (the shed skins of aphids) are recognizable signs that a plant is infested. There are many options for chemical control of aphids – for a list of conventional and OMRI-approved insecticides in protected culture, see Table 20: Insecticides Labeled for Insects and Mites on Vegetable Transplants in the New England Vegetable Management Guide. Biological control using aphid predators and parasitoids can also be used for targeted prevention or management of aphids. For more information, see last issue’s article on aphid biocontrol in greenhouses and high tunnels.
| Table 1. Growing degree day accumulation, jan 1 - may 1, 2024 | ||
|---|---|---|
| Location |
GDD (base 40°F) Cabbage and onion maggots |
GDD (base 1°C) Allium leafminer |
| Western MA | ||
| Deerfield | 365 | 424 |
| Westfield Arpt | 430 | 469 |
| Chicopee Falls | 424 | 471 |
| South Deerfield | 405 | 453 |
| Central MA | ||
| Leominster | 352 | 407 |
| Northbridge | 379 | 433 |
| Worcester | 382 | 424 |
| Eastern MA | ||
| Bolton | 369 | 422 |
| Stow | 367 | 425 |
| Lawrence Arpt | 352 | 407 |
| Ipswich | 396 | 468 |
| East Bridgewater | 435 | 490 |
| Boston | 423 | 473 |
| New Bedford Arpt | 460 | 516 |
Contact Us
Contact the UMass Extension Vegetable Program with your farm-related questions, any time of the year. We always do our best to respond to all inquiries.
Vegetable Program: 413-577-3976, umassveg@umass.edu
Staff Directory: https://ag.umass.edu/vegetable/faculty-staff
Home Gardeners: Please contact the UMass GreenInfo Help Line with home gardening and homesteading questions, at greeninfo@umext.umass.edu.
Winter Annual Weeds
If you are seeing plants in your field that are currently flowering—or even setting seed (Video 1)—they are probably winter annuals. Winter annual weeds germinate in the fall, flower in the early spring, set seed, and die by mid-summer (Fig. 1)1. See the UMass factsheet on weed lifecycles for more information on the differences among summer annuals, winter annuals, biennials, and simple and creeping perennial plant lifecycles.
This year there seem to be more winter annuals than usual. I have seen fields covered in Lamium purpureum (purple deadnettle), Draba verna (spring whitlowgrass), and Stellaria media (common chickweed). According to the UMass landscape weeds specialist, Dr. Randy Prostak, who has been working here much longer than I have, this bumper crop of winter annuals is unusual. It is probably due to our recent weather. Last summer there was record-setting rain, followed by a warm wet winter2. Wet weather can help break the dormancy of winter annual weeds3 and a mild, wet, winter can increase the survival of winter annuals4,5. With increasing global temperatures leading to changed weather patterns, this may become more common. In Massachusetts, we are predicted to experience warmer weather, more frequent droughts, and less frequent but more intense rainstorms6. These conditions may result in more years where there is a flush of winter annual growth, like we are seeing now.
What should we do when there is a flush of winter annual weeds? Well, maybe we do not need to do anything. For many annual cropping systems, the weeds are mostly killed when soil is prepared in the spring with cultivation and bed preparation. Winter annuals can even act as an unplanted cover crop, keeping the soil covered when it would otherwise be bare7.
However, winter annuals can also:
- Act as an alternative host for pests such as soybean cyst nematode8 and many brassica pests9.
- Reduce soil temperature and decrease soil moisture in the spring, which could affect planting dates10.
Depending on your crop and the growing conditions, these effects could reduce annual crop growth during the season.
In perennial systems, winter annuals can become a more consistent issue. For example, maintaining a vegetation-free strip under apples from May through July leads to the highest yields11. Some winter annuals will have completed their lifecycle by May, but others will not. Winter annuals can also proliferate in matted row strawberries, where early season weed management is most important for establishment of a recently planted crop12.
If you need to control winter annuals in a perennial system, mowing in the spring may help reduce seed set and vole habitat in orchards. You can also use herbicides, but if you wait until the spring, some weeds may be too large for an effective post-emergent application by the time the temperature is warm enough to spray. It is actually easiest to control winter annuals in the fall, before they emerge (if using a pre-emergent spray), or when they are still small and most susceptible to herbicides (if using a post-emergent spray).
Here is a list of common winter annual weeds you may notice in your field with links to great sites with more photos, identification tips, and management techniques.
- Annual bluegrass (Poa annua) can also be a summer annual, but right now you can see winter annual variants flowering (Fig. 2a). The flower is underwhelming – I would not put it in a bouquet – but the seed head (inflorescence) can help with identification. Grasses are notoriously tricky to identify, so we will take what we can get. You can also identify annual bluegrass by its prow-shaped leaf tip (Fig. 2b).
- Purple deadnettle (Lamium purpureum L.) and Henbit (Lamium amplexicaule L.): These weeds are easy to confuse. Both are in the mint family, with spreading growth habits, purple flowers, and root at the nodes. To tell them apart I look for the upper leaves, near the flowers (if there are any). Henbit leaves will circle the stem and remind me of a ruff, popular in Europe in the mid-16th and 17th centuries. Purple deadnettle leaves will be downward-pointing and purple-ish.
- Many winter annuals are brassicas. Brassica flowers have 4 petals and are usually white or yellow. The flowers of the species I’m seeing the most right now are white.
- Hairy bittercress (Cardamine hirsuta L.): You can find this already setting seed. The seed pods are called siliques and are purple-ish when the seeds are mature. Once mature, a gentle touch will burst the pods, flinging seeds up to three feet from the plant, which is fun to do (Video 1)
- Shepherd’s purse (Capsella bursa-pastoris) rosette leaves can have a variety of shapes from toothed to deeply lobed. Leaves can be smooth, but most have star-shaped hairs. Once it sets seed, seeds are contained in a distinctive flat triangular or heart-shaped pod that resemble a Greek shepherd’s purse.
- Spring whitlowgrass (Draba verna) also has branching hairs on the leaves, similar to Shepherd’s purse, but the stem is leafless and the rosette is smaller. The flower has 4 deeply lobed petals, that can be mistaken for 8 petals.
- Common chickweed (Stellaria media [L.] Vill.) is not a brassica, but has similar-looking flowers to Draba verna. There are 5 petals, instead of 4, but they are deeply lobed and can appear to have 10. It has a spreading growth habit and smooth, opposite leaves.
-- Written by Maria Gannett
References:
- Bellinder, R. R., Kline, R. A. & Warholic, D. T. Weed control for the home vegetable garden. (1963).
- Blue Hill Observatory. Monthly temperature. (2023).
- Walck, J. L., Hidayati, S. N., Dixon, K. W., Thompson, K. & Poschlod, P. Climate change and plant regeneration from seed. Glob. Change Biol. 17, 2145–2161 (2011).
- Ramesh, K., Matloob, A., Aslam, F., Florentine, S. K. & Chauhan, B. S. Weeds in a Changing Climate: Vulnerabilities, Consequences, and Implications for Future Weed Management. Front. Plant Sci. 8, (2017).
- Peters, K., Breitsameter, L. & Gerowitt, B. Impact of climate change on weeds in agriculture: a review. Agron. Sustain. Dev. 34, 707–721 (2014).
- Card, B. A. Massachusetts Climate Change Assessment. 22 https://www.mass.gov/doc/2022-massachusetts-climate-change-assessment-de... (2022).
- Breth, D., Tee, E., Donahue, D. & Wallis, A. Managing apple orchard weeds in the fall. N. Y. Fruit Q. 24, 9–15 (2016).
- Basnet, P., Clay, S. A. & Byamukama, E. Reproduction of Soybean Cyst Nematode Populations on Field Pennycress, Henbit, and Purple Deadnettle Weed Hosts. Agronomy 12, 2027 (2022).
- Chen, M. et al. Occurrence of the New Invasive Insect Contarinia nasturtii (Diptera: Cecidomyiidae) on Cruciferous Weeds. J. Econ. Entomol. 102, 115–120 (2009).
- Bradley, K. Integrated Pest Management University of Missouri. Considering fall herbicide applications: It’s not just about the weeds https://ipm.missouri.edu/cropPest/2013/9/Considering-Fall-Herbicide-Appl... (2013).
- Merwin, I. A. & Stiles, W. C. Orchard groundcover management impacts on apple tree growth and yield, and nutrient aailability and uptake. J Am Soc Hort Sci 119, 209–215 (1994).
- Pritts, M. P. & Kelly, M. J. Early season weed competition reduces yield of newly planted matted row strawberries. HortScience 36, 729–731 (2001).
How to Take a Photo for Plant Diagnostics
-- Written By Elizabeth Buck, Cornell Cooperative Extension Vegetable Program. Originally published in the May 13, 2020 issue of Cornell Veg Edge
Using pictures to quickly address production questions has a lot of appeal and utility. I love the idea of using grower-captured photos to hasten the troubleshooting process, especially since it isn’t always possible to make prompt farm visits. But in practice it can be quite tough to work out a problem using photos because of poor image quality.
High quality diagnostic photos absolutely can allow us (and other ag professionals) to make pretty confident IDs and assessments of what is going wrong. I frequently send diagnostic images to our plant pathologists for a preliminary read on the situation, it works great. Examples of high quality diagnostic images are regularly published in our pest/disease/weed management articles.
What makes a high quality image?
A high quality image has 3 key components:
- The image matches exactly what you are seeing. Same colors, same level of detail.
- The image is well focused on the intended subject (is “sharp”).
- The image captures the correct part of the field, plant, bug, etc to make an ID.
In practice, meeting these three criteria takes some time. I typically spend 3-5 minutes capturing a series of high quality images to use in VegEdge or to send off to our plant pathologists or entomologists. Below you’ll find tips on how to capture a good image, but first you should know some things.
Things you should know:
- Cameras sense a lot more light than our eyes can. Our eyes saturate with light and stop perceiving increased light well below the level of light that a camera (and plants) can perceive. This is why images taken in a sunny field tend to be over exposed and look washed out relative to what your eye perceives. The camera is showing you how much more light there is than you can physically realize. In a way, the camera is better than our eyes at showing us the relative amount of light a plant “sees”.
- So much of diagnostics relies on picking out slight color differences in plant tissue. Sunglasses alter how colors look. Something that stands out well with sunglasses on may not be as distinct with them off. I cannot pick out the slight yellow checkerboard of early stage cucurbit downy mildew when I scout with my sunglasses on because my shades filter out light in a way that changes the appearance of yellow objects. Cameras don’t filter light and color the same way as your sunglasses do. It is difficult to get the photo to capture exactly what someone wearing sunglasses perceives – far easier to take shades off.
- Making an ID usually takes several photos. This number changes based on the problem. Insects can be done in as little as 1 or 2 high quality pictures. Weeds and feeding damage on crops usually require 2-3 good images. Plant diseases and mystery problems are almost always 3-5 photos. Remember that disease symptoms can vary from the upper and lower sides of leaves and images of both can be helpful.
Different problems need different images:
- For insects you see, take a focused close-up of the pest. A couple images showing feeding damage, any frass, and where on the plant you’re finding the damage can ID pests you don’t see.

- To ID caterpillars, a top shot showing its head and a side shot of its pattern are really useful.
- For broadleaf weeds, take photos of the overall growth habit, a detail shot of some middle aged leaves, and one showing flowers or any other distinctive features like spines or rosettes.
- For grasses, a picture of the growth habit and a close-up, a focused image showing where the leaf meets the stem while you gently tug on the leaf blade will work well.
- For diseases causing foliar symptoms, include the overall plant, the portion of the plant showing symptoms but not yet fully destroyed, and a focused close up of the symptom.
 For example, with septoria of tomatoes I’d take pictures of a couple of staked plants showing that the problem is worst lower on the plant and that there is mud splashed up on the lower leaves. The next photo would be of a mid-aged leaf that is starting to yellow and is showing lesions. The last photo would be a close up of a mature lesion showing the surrounding tissue and a pale lesion with black specks in the center.
 - For diseases causing root symptoms, abiotic issues, or mysteries take a picture of the field where the problem is occurring, a whole plant above-ground photo, pictures any above ground symptoms on the foliage, a shot of what the roots look like, and an image of the crown sliced open vertically. For example, if I’m diagnosing sad transplants, I’m taking a photo of the greenhouse area with bad flats, a picture of the condition of the flat showing the soil and tops of the healthy and affected plants, a close up a sad plant focused at the lower stem, and a shot of a sick seedling’s roots.


Steps for taking a high quality image:
- Clean off the lens of your camera before taking an image.
- Clean up the area around the subject. Push unwanted leaves out of the way, pull up weeds. This will help the camera isolate the subject from the background and improve the sharpness.
- Take off your sunglasses so you can match the image exactly to what you see.
- On bright days, hold your ball cap bill over the phone to shade the lens & reduce oversaturation.
- Stabilize the camera. Prop your elbow on your knee, ribs, the ground, stakes, etc.
- Center the focal point on the subject.
- Zooming in too far blurs an image. Better to adjust your distance from the subject first, then zoom so you maintain sharpness and level of detail.
, which allows for a downy mildew diagnosis. The same diagnosis cannot be made from the image on the left.")
- Adjust the lighting (white balance) of your image before taking the photo! This is the last thing you do before taking an image. Many phones have a little sun icon that you can slide higher or lower. Make the colors match what your eye sees.
, which allows for a downy mildew diagnosis. The same diagnosis cannot be made from the image on the left.")
Pro Tips:
-
Windy day? Take leaves off plants, especially for shots of feeding damage and diseases. Place on any non-reflective surface like the ground, a truck seat, or even your pant leg.
-
Really tiny bug or something you saw with a hand lens? Hold the scouting lens up to the camera lens. Move closer or further from the subject to take macro shots, don’t zoom. The hand lens wi
 ll distort the edges of the image, so make sure the subject is in the center.
 - Bugs moving around too much? Catch them and toss them in the freezer over lunch. They’ll be dead or very slow at the end of lunch and they’ll still have all their original coloring.
- Having trouble focusing sharply on the subject instead of the background? Try using portrait mode on your phone. Or, put your hand directly behind the subject to obscure the background and refocus your image. Once it refocuses, remove your hand and quickly take the picture. This requires one-handed picture taking so be sure to stabilize the camera.

Sprayer Math or How I Learned to Stop Worrying and Love Sprayer Calibration
When you hear “did you calibrate your sprayer?” do you feel a wave of anxiety and rush to change the subject? Well, I have a secret for you: calibrating your sprayer is not a complicated laboratory science experiment. It’s just another way of saying, "did you put the right amount of water and pesticide (or fertilizer) in your sprayer, and is the right amount coming out of it?” By using just a few pieces of easily measured information, calibrating your sprayer will cost-effectively improve your pest control.
Two Pieces of Info Needed:
-
How much water you need. This could mean:
-
How much water you need to cover the crop (is it a tiny seedling you can cover with one nozzle or is it now vined out and you need an 8’ boom with 4 or 5 nozzles?)
-
How much water do you need to drench the soil at the base of the plant for an in-furrow treatment?
-
How much water you need to evenly cover the soil with a pre-emergent herbicide?
-
Different applications will require different nozzles, boom heights, and pressures for ideal coverage (the label will state ideal settings for applying the pesticide). These settings will affect the amount of water needed to spray your field. Whatever you are spraying, you need to know how much water it will take you to do the job before you start.
-
How much pesticide you need. This could be the amount of pesticide needed for a certain area (e.g. 1 acre of pumpkins or three 200 ft beds of tomatoes). You will find this information on the pesticide label, and it might be expressed in different units, e.g. 1 pound/A or 3.2 fl oz/1000 row feet or 3% v/v.
There are a few different ways to do the math, which can make it confusing. Pick a method that makes sense to you, take notes on what you did and how you spray each crop, and then do the same thing next time. See below for the method I like to use.
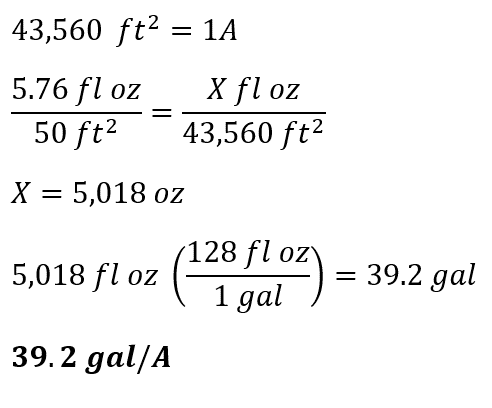
Fill the sprayer tank—whether using a backpack or tractor-mounted sprayer—with some amount of water, time yourself walking or driving at a constant speed as you spray a known area of crop, e.g. 10 bed feet, with beds on 5-foot centers (50 ft2 total). Did you get good coverage? If not, adjust the nozzles, pressure, speed, etc. until you have the coverage you are happy with. Time yourself as you spray that 10 feet a few times and take the average. We’ll say it took 14 seconds to spray 10 bed feet. Then put a measuring pitcher or cylinder under the spray nozzle and collect the spray for that amount of time—14 seconds. If you have more than one nozzle, collect the spray from each nozzle independently to make sure they are all emitting the same amount of water +/- 10%. For this example, let’s say you collected 5.76 oz of spray in 14 seconds. You now know how much water you used to spray a known area and you can do some cross-multiplication to get the total amount needed for the total area you will spray. E.g. 5.76 oz per 10 bed feet is equal to 5,018 oz/A or ~40 gal/A. See below for the math:
We know we are going to apply an insecticide to control aphids. The label lists the application rate for that crop-pest combination as 4 oz/A. So we would add 4 oz (equal to 118.3 milliliters or a ½ cup) to 40 gallons in the tank
So now you know how to do your sprayer math, the first step in calibration.
Calibrating also requires double-checking that your filters or nozzles aren’t clogged or worn out and that the right amount of spray is coming out—that is the kind of calibration that your pesticide inspector might be looking for. Proper calibration will also ensure that you are getting the coverage you expect and the right amount of pesticide out there to do the job well. Every time you double check the amount of water coming out of your sprayer and make sure it matches the need for your crop you are calibrating. If you get complacent and do the same thing year after year without ever confirming you are still getting the same result, you will not be getting the control you expect and you will be misapplying pesticides, resulting in off-label applications that can contribute to environmental harm or pests developing resistance to chemicals that were repeatedly applied at too low a rate. Always follow all the label instructions, use the proper personal protective equipment (PPE) listed on the label, and be safe!
Additional resources:
- Purdue Sprayer Nozzle Guide
- 1/128th Method for Sprayer Calibration. Worksheet by George Hamilton, UNH Extension Emeritus
--Written by S. B. Scheufele
News
URI Laser Scarecrows Available
Research at the University of Rhode Island, Cornell Cooperative Extension, and the University of Florida/USDA-APHIS National Wildlife Research Service has shown that the use of automated lasers can significantly reduce bird damage to sweet corn.
The URI Laser Scarecrow Project is making experimental devises available to growers who want to try the technology on their farms. Fully assembled scarecrows are available for $800 each to participating farmers. A single unit has a protection radius of 300-500 ft for sweet corn. Preference will be given to sweet corn growers but the scarecrows can be used in other crops.
For more information or to request a scarecrow, contact Dr. Rebeca Brown at brownreb@uri.edu or 401-874-2755, or visit laserscarecrow.info.
MDAR Grant Programs for Farmers Now Open
Urban Agriculture Program
This program award grants statewide to promote strategies addressing food insecurity, to expand and create new economic opportunities and to increase access to fresh, local produce in urban neighborhoods. $5,000-$50,000 for commercial urban agriculture projects, $1,000-$20,000 for community garden and food production projects, or $150,000 for land acquisition (restrictions apply).
Applications Due: 4:00 PM on Monday, May 6, 2024
Contact: Rose Arruda at Rose.Arrruda@mass.gov or (617) 851-3644
Agricultural Food Safety Improvement Program (AFSIP)
The Agricultural Food Safety Improvement Program (AFSIP) is a reimbursement grant program that supports produce and aquaculture operations that are looking to improve their food safety practices that work towards minimizing the risks of microbial contamination and food-borne illnesses while increasing market access.
Participants selected for funding are provided with reimbursement grants for 80% of total project costs up to $50,000.
Applications Due: 4:00pm on Friday, May 24, 2024.
Contact: Laura Maul at Laura.Maul@mass.gov or 857-507-5972
Climate Smart Agriculture Program (CSAP)
The Climate Smart Agriculture Program links MDAR's water, energy, and climate grants together into one application. This includes the Agricultural Climate Resiliency & Efficiencies (ACRE) Program, the Agricultural Environmental Enhancement Program (AEEP), and the Agricultural Energy Grant Program (ENER). This program continues the goals of the three individual grants by implementing projects that help the agricultural sector adapt to climate change, mitigate climate change, reducing or preventing impacts to natural resources that may result from agricultural practices, and that improve energy efficiency and facilitate adoption of alternative clean energy technologies.
The CSAP grant is broken into two sections.
- Section I: Environment is for environmental projects such as soil health, water use efficiency, or other projects working towards reducing or limiting greenhouse gas emissions.
- Section II: Energy is Ag-Energy projects to improve energy efficiency or to facilitate clean energy adoption.
Applicants can apply to either or both sections.
Participants selected for funding under either section are provided with reimbursement grants for 80% of total project costs up to $50,000.
Applications Due: 4:00pm on Friday, May 31, 2024.
Contacts:
- Section I: Environment - Laura Maul at Laura.Maul@mass.gov or 857-507-5972
- Section II: Energy - Gerry Palano at Gerald.Palano@mass.gov or 617-571-4969
Events
Twilight Meeting at Tangerini's Farm
When: June 12, 2024, 4-7pm
Where: Tangerini's Spring Street Farm,139 Spring Street, Millis, MA, 02054
Registration: Free! Please register in advance, for food ordering purposes. Click here to register.
Join Tangerini Farm, the UMass Extension Vegetable Program and SEMAP for a twilight meeting!
- Steve Chiarizio of Tangerini Farm will describe the new tile drainage system and bioreactor that they installed at the farm last year with the help of Massachusetts FSIG funding. A representative from Alleghany Services, who installed the system, will also be on-hand to answer questions.
- Maria Gannett, UMass Extension Weed Specialist, and Sue Scheufele, UMass Extension Vegetable IPM Specialist, will talk about sweet corn weed and insect pest management options.
Presentations 4-6 pm, followed by a light supper.
Program co-sponsored by UMass Extension and the Southeastern Massachusetts Agricultural Partnership (SEMAP)
Pesticide recertification credits TBD
Transition to Organic Partnership Program: Brookfield Farm Field Walk
When: Tuesday, June 25, 2024, 4-7pm
Where: Brookfield Farm, 24 Hulst Rd., Amherst, MA 01002
Registration: Free! Please register in advance, for food ordering purposes. Click here to register.
Join Brookfield Farm, the UMass Extension Vegetable Program and NOFA/Mass for a twilight meeting!
- Kerry and Max Taylor from Brookfield Farm will describe the new well they installed last year that includes a solar pump. The well was installed with support from NRCS.
- Sue Scheufele, UMass Extension Vegetable IPM Specialist, will lead a field walk and pest scouting demonstration.
- Maria Gannett, UMass Extension Weed Specialist, will lead a weed walk and discuss weed ID, organic weed management, and the relationship between weeds and soil health.
Presentations 4-6 pm, followed by a light supper.
Vegetable Notes. Maria Gannett, Genevieve Higgins, Lisa McKeag, Susan Scheufele, Alireza Shokoohi, Hannah Whitehead, co-editors. All photos in this publication are credited to the UMass Extension Vegetable Program unless otherwise noted.
Where trade names or commercial products are used, no company or product endorsement is implied or intended. Always read the label before using any pesticide. The label is the legal document for product use. Disregard any information in this newsletter if it is in conflict with the label.
The University of Massachusetts Extension is an equal opportunity provider and employer, United States Department of Agriculture cooperating. Contact your local Extension office for information on disability accommodations. Contact the State Center Directors Office if you have concerns related to discrimination, 413-545-4800.