Rotary Spreader Calibration Procedures
The accurate application of lawn materials requires proper calibration of lawn spreaders of which there are two basic types:
- drop spreaders
- rotary spreaders
Most professional grade fertilizers and pesticides come with directions for calibration and recommended spreader settings. However, these recommended settings are “suggested” spreader settings and are a good starting point but should be validated by calibration
Regardless of the material (fertilizer, seed, pesticides), spreader calibration procedures will be the same for any granular type material providing the material is free flowing.
In the examples given below using different calibration methods a 20-5-10 fertilizer will be calibrated to deliver 1 pound of nitrogen (N) per 1,000 square feet. (1000 square feet abreviated as “M”).
To achieve this desired N rate, 5.00 pounds of total material (TM) per 1,000 square feet needs to be applied. This is calculated as:
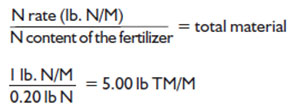
The spreader is properly calibrated when the calibration rate is within ± 5% of the recommended 5.00 lb. (in this example when the calibration rate falls between 4.75 to 5.25 lbs. of fertilizer per 1,000 sq. ft.).
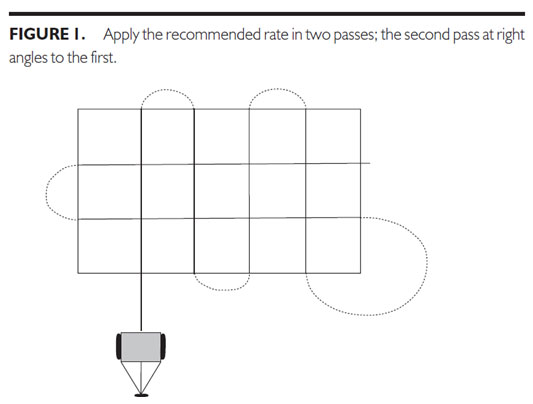
A more uniform application can be obtained when using drop-type or rotary spreaders if the recommended rate is applied in two applications; one half the rate is applied in one direction and the other half at right angles to the first as shown in Figure 1. If this strategy is used then the calibration rate is cut by half. In our example, the recommended rate in order to apply 20-5-10 at 1.0 lb. N per 1,000 sq. ft. is reduced by half and the calibration rate is 2.5 lb. of 20- 5-10 per 1,000 sq. ft. The procedures outlined below are based on a calibration in which the material is to be applied in a single application. However, the calibration procedures are exactly the same for the single-pass and double-pass application strategy.
Checking Rotary Spreader Distribution Patterns
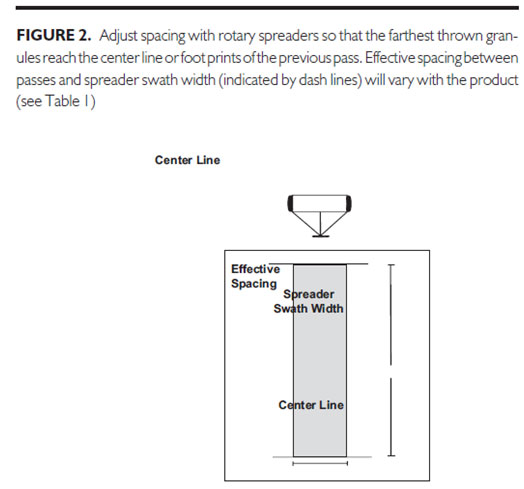
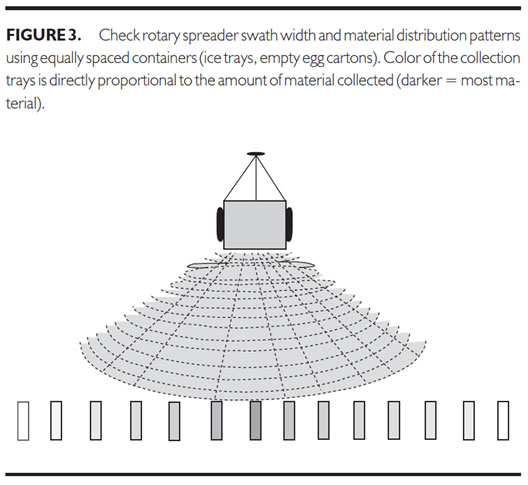
Drop-type spreaders are uniform in the distribution of granules across the swath width. Rotary spreaders, however, are not uniform in distribution of material. For example, rotary type spreaders apply material in a fan like pattern with the heaviest rates applied to the center of the spreader path while to left and right of center application rates decline in a bell shape like curve with distance. As a result of this non-uniform distribution pattern, effective overlap (30 to 50%) between adjacent passes is critical to ensuring application uniformity with rotary spreaders. The recommended spacing between adjacent passes changes with the density and particle size of the material and with the spreader. Fertilizer, seed, and pesticide impregnated on lightweight carrier (such as corncob or vermiculite) have different effective pattern spacings as shown in Table 1. The general rule for spacing between passes with rotary type spreaders is to adjust spacing so that the farthest thrown granules reaches the center line or foot prints of the previous pass as shown in Figure 2. Always check the distribution pattern and spreader swath width of any material when using rotary spreaders and read manufacturer’s directions for calibration and recommended spacing. The best method to check for distribution pattern and swath width is to lay out shallow cartons (egg cartons or plastic ice trays) on a line perpendicular to the direction of travel (see Figure 3). Boxes with partitions will prevent particles from rebounding. All boxes should have the same area and height measurements. Space the boxes 1 foot apart, and make sure that the row of boxes is at least 1.5 to 2 times the width of the anticipated effective spacing.
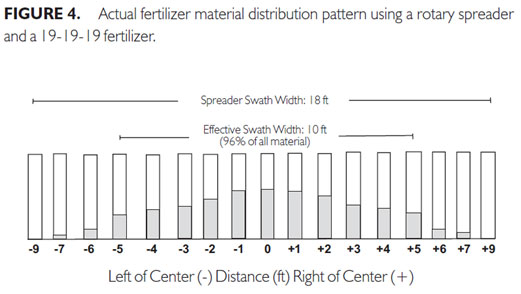
To conduct the test, fill the spreader at least half full, set it at the suggested spreader setting, and make three passes in the same direction over the boxes using normal walking speed. Weigh the material or put the material from each box into a test tube, vial, or small narrow bottle. When the bottles are placed side by side in order, a plot of the distribution pattern is visible. Equivalently, when the weights of the collected material from each box collected is plotted with distance, the distribution pattern is revealed as shown in Figure 4. The “effective” swath width (the measured distance from the center that is associated with the majority of the released material distributed from the spreader) is twice the distance out from the center of the spreader to the point where the rate is one half the average rate at the center. For example, as illustrated in the Figure 4 using a 19-19-19 fertilizer the effective swath width is 10 feet (5 feet left and right of the spreader centerline) and the spreader swath width is 18 ft. Therefore, you should space your passes 8 feet apart to provide effective overlap and a more uniform application using the 19-19-19 fertilizer example. Determining the swath width (width of the distribution pattern as shown in Figures 2, 3, and 4) is the first step in any rotary spreader calibration process!
"Catch Sheet Method" Calibration Procedure
- Select a setting for the spreader; if available, use a manufacturer’s recommendation as a starting point.
- Fill the hopper with material, at least half full.
- Operate the spreader over a large enough sheet of plastic, cloth, or paper, such as a painter’s drop cloth, to capture all the material.
- Measure the area covered as: distance x swath width.
- Collect and weigh the material on the sheet.
- The application rate based on a standard weight per unit area is pounds per 1,000 square feet and is determined using the following formula: Adjust the rate setting and repeat the process until the desired rate is achieved.

- Adjust the rate setting and repeat the process until the desired rate is achieved.
- Record the material, rates, and settings in a record book for later reference. In this example:
- The spreader swath width is: 15 ft.
- The linear distance traveled is: 30ft.
- Therefore, the calibration area is: 15 x 30 ft or 450 sq. ft.
- The fertilizer amount collected from the catch sheet weighs: 1.1 lbs.
The design of the rotary spreader used in this example requires spreading wheel track-to-wheel track (see Figure 2). The 20-5-10 fertilizer will be applied at a rate of 1 lb. N per 1000 sq. ft. in a single pass. Because of the overlap required, the area is covered twice. As such, the calibration rate is to be reduced by half accordingly from 5.0 to 2.5 lb. of 20-5-10 per 1,000 sq. ft. Operating using a single pass with the overlap will result in the desired spread rate of 5.0 lb. of fertilizer per 1,000 sq. ft.. (NOTE: calibrating to deliver the recommended rate in two passes [as shown in Figure 1] with overlap [as shown in Figure 2] would require the application rate of 5.0 lb. of 20-5-10 per 1,000 sq. ft. to be reduced to 1/4 (1/2 x 1/2=1/4) of 5.0 which is 1.25. Some professional rotary spreaders are designed to deliver the material using a “slight overlap.” Therefore, no significant adjustment in the application rate is needed to compensate for overlap for rotary spreaders using a slight overlap design. Using Eq. 1 the calibration rate in standard units of lb. per 1,000 sq. ft. is calculated as:

Hence: the calibration rate of 2.4 lb. of 20-5-10 fertilizer per 1,000 sq. ft. with the overlap is 4.8 lb. per 1,000 sq. ft. is within ± 5% the recommended rate of 4.75 to 5.25 lb. of 20-5-10 fertilizer per 1,000 sq. ft.
| Material | Effective Spacing |
|---|---|
| Fertilizers | 8 to 10 ft |
| Impregnated carriers: vermiculite, corn cob | 4.5 to 5 ft |
| Seed | 3.5 to 4.5 ft |
"Remainder Method" Calibration Procedure
The “remainder method” works well for small spreaders that can be easily emptied.
- Select a setting for the spreader; if available, use a manufacturer’s recomendation as a starting point.
- Fill the hopper with a known amount of material, such as 50 pounds.
- Apply material to a specific, known test strip area such as 1,000 square feet.
- Weigh the remainder of the material in the spreader. The difference between the starting weight and final weight is the amount applied.
- Continue at step 6 in “Catch Sheet Method” Calibration Procedure above.
"Replacement Method" Calibration Procedure
The “replacement method” is for large, tractor drawn or mounted rotary spreaders that cannot be easily emptied for weighing purposes.
- Select a setting for the spreader; if available, use a manufacturer’s recommendation as a starting point.
- Mark the hopper at a given level, and fill with material to that mark.
- Apply material to a specific, known test strip area such as 1,000 square feet.
- Weight the amount of material needed to refill the spreader.
- Continue at step 6 in “Catch Sheet Method” Calibration Procedure above.
Rotary Spreader Operation
- Walk at normal speed (5 ft per sec); a faster pace will result in a lighter application rate.
- Overlap to obtain a uniform application; effective overlap changes with each product.
- Use tighter pattern spacing for seed (3.5 to 4.5 ft) and pesticides (4.5 to 5 ft) than fertilizer materials (8 to 10 ft).
- Spread wheel track to wheel track (or footprint to footprint); space pattern so that the farthest thrown granules are hitting the wheel marks of the previous pass.
- Dry materials with different granule sizes and weights do not spread uniformly.
- Check for clogs and obstructions of the drop holes or ports in the hopper.
- Check and monitor spreader calibration accuracy during spreader operation.
--
Revised: 05/2011