A monthly e-newsletter from UMass Extension for landscapers, arborists, and other Green Industry professionals, including monthly tips for home gardeners.
To read individual sections of the message, click on the section headings below to expand the content.
To print this issue, either press CTRL/CMD + P or right click on the page and choose Print from the pop-up menu.
Tomato Brown Rugose Fruit Virus (ToBRFV) - Information for home gardeners
Tomato Brown Rugose Fruit Virus (ToBRFV) is an emerging disease issue in tomato crops worldwide. First identified in 2014, a number of outbreaks have since occurred in North America, Europe, the Middle East, and Asia. Natural infection of pepper has also been reported. One report of eggplant infection has been recorded but not verified. Cut-leaf ground cherry (Physalis angulata) is also considered to be a host.
ToBRFV is closely related to Tobacco mosaic virus (TMV). Like TMV, ToBRFV is very contagious and can be transmitted from plant to plant by mechanical means such as handling and cultivation tools. This virus does not pose any health threat to animals or humans.
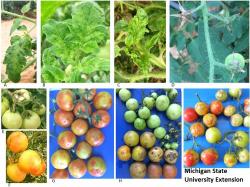 The symptoms of ToBRFV on tomato and pepper can vary and include deformed, crinkled leaves, mosaic, mottling, flecking, yellowing, and browning. Fruit symptoms include discoloration and rough brown patches or ringspots. Irregular fruit shape and maturation patterns may also occur. Browning of the veins in the fruit calyx (the leaf-like structures around the attachment point) in the early stages of fruit ripening may also be observed. Symptom expression can vary widely among cultivars: some plants may be infected but remain asymptomatic.
There are currently no ToBRFV-resistant tomato varieties. In peppers, the L genes that confer resistance to TMV and Pepper mild mottle virus (PMMoV) appear to be stable and confer resistance to ToBRFV as well. Pepper varieties lacking these genes are highly susceptible to ToBRFV. The virus may be transmitted from peppers to tomatoes or vice versa.
If you receive notification of a positive ToBRFV test from your seed company, don’t panic! There are a few things you will need to do in order to insure that the virus is contained:
- Put all tomato, pepper, and eggplant seedlings in your propagation room into a garbage bag. Include the soil the seedlings were growing in. Put the bag into a second garbage bag, tie it, and place it in the trash. Discard all tomato, pepper, and eggplant seedlings currently in your operation regardless of seed origin. Discard any remaining seeds from the infected lot.
- Disinfect indoor growing spaces, pots, flats, and tools as thoroughly as possible using a 10% bleach solution; this is made by mixing 1 part bleach to 9 parts water. Remove as much soil from pots and flats as possible before disinfecting. Wear disposable gloves and disposable shoe covers while disinfecting and discard these when you are finished.
- Do not start a new batch of tomato, pepper, or eggplant seeds this year.
Angela Madeiras, UMass Extension Plant Pathologist
Herbicide Resistance: An Emerging Issue in Weed Science
You may have heard about the herbicide resistance (HR) that has developed in weeds such as horseweed (Erigeron canadensis or Conyza canadensis) and Palmer amaranth/Palmer pigweed (Amaranthus palmeri). The development of an herbicide resistant weed is of great concern in agriculture. Herbicide resistance can occur for several different reasons. This article explains herbicide resistance, how it develops, and how we might slow or mitigate its occurrence.
Herbicide selectivity is a fundamental principle in the discipline of weed science. Herbicide selectivity is important because it is the primary phenomenon behind the use of herbicides in weed management. Herbicide selectivity is defined as the favorable interaction of the plant, herbicide and the environment; in other words, the ability of a given herbicide to kill certain plant species (WEED) without significant injury to others (CROP). The weed species is know to be susceptible and the crop species is know to be tolerant.
Let us now explore the meaning and definition of herbicide tolerance and herbicide selectivity. Herbicide tolerance is the inherited ability of a species to survive and reproduce following an herbicide treatment. There was no selection to make the plants tolerant as these plants simply possess a natural tolerance. Herbicide susceptibility is the degree to which a plant is subject to injury or death due to a particular herbicide (Table 1).
| Herbicide product | Tolerant species | Susceptible species |
|
Trimec ClassicTM: (2,4-D, MCPP & dicamba) postemergence broadleaf turf herbicide |
Kentucky bluegrass, perennial ryegrass, tall fescue, fine fescue |
dandelion, plantain, henbit, common chickweed, mouseear chickweed, corn speedwell |
|
Envoy PlusTM: (clethodim) |
broadleaf ornamental landscape plants - broadleaf herbaceous perennials and groundcovers, woody ornamentals |
large and smooth crabgrass, barnyardgrass, yellow foxtail, goosegrass, annual bluegrass, quackgrass, nimblewill |
|
Drive XLR8TM: (quinclorac) |
Kentucky bluegrass, perennial ryegrass, tall fescue, fine fescue (only when part of a turf stand |
crabgrass and barnyardgrass (1 leaf to 1 tiller and 5 tiller and larger), white clover, dandelion, speedwell |
|
TenacityTM: (mesotrione) |
Kentucky bluegrass, perennial ryegrass, tall fescue, fine fescue (only when part of a turf stand |
crabgrass (1 leaf to 1 tiller), yellow nutsedge, nimblewill |
With an understanding of herbicide selectivity under our belt, let’s define and explain herbicide resistance. Herbicide resistance (HR) is the inherited ability of a plant to survive and reproduce following exposure to a dose of herbicide that is normally lethal. “Resistance may be naturally occurring or induced by such techniques as genetic engineering or selection of variants produced by tissue culture or mutagenesis.” Genetic engineering techniques have given us RoundUpTM ready crops such as soybeans, field corn, cotton, and sugar beets. In summary, herbicide resistance is a change in the sensitivity of a weed population over time to an herbicide, resulting in the failure of a correct application to control the weed.
There are two general mechanisms of herbicide resistance: target site resistance (TSR) and non-target site resistance (NTSR). Target site resistance (TSR) is when the enzyme in the plant that is the target of the herbicide becomes “insensitive” to the herbicide that was applied. The loss of sensitivity is usually associated with a mutation in the gene that codes for the enzyme that the herbicide adheres to in the plant. These mutations lead to physical changes in the enzyme’s shape/structure which prevents herbicide-binding, thus reducing or eliminating herbicidal activity. NTSR can impede herbicide uptake/absorption, translocation or protect the plant against the actions of the herbicide. NTSR is conferred as a result of the alteration of one or more physiological processes in the plant, including herbicide absorption, herbicide translocation, herbicide sequestration/compartmentalization, protein over-expression, and metabolism (Table 2). Mechanisms of NTSR are generally more complex to decipher than TSR.
| Mechanism | Mechanism description |
|
Uptake/absorption |
Herbicide does not enter the plant. |
|
Translocation |
Herbicide enters plant but is not translocated to site of action. |
|
Herbicide sequestration/ compartmentalization |
Weed restricts the movement of foreign compounds (herbicides) within their cells or tissues to prevent the compounds from causing harmful effects. The herbicide may be inactivated either through binding (such as to a plant sugar molecule) or removed from metabolically active regions of the cell to inactive regions. |
|
Protein over-expression |
Target protein, on which the herbicide acts, can be produced in large quantities by the weed, with the effect of the herbicide becomes insignificant. |
|
Metabolism |
Weed has the ability to quickly degrade an herbicide (detoxify) to an inactive form before it reaches its site of action within the plant. |
There are a number of variables that determine the likelihood of a weed population developing herbicide resistance, which include life cycle, type of cropping system, and herbicide use practices. In general, herbicide resistance is more common with annual weeds than perennial weed speicies. Development of herbicide resistance in a weed population is more common in cropping systems that utilize frequent cultivation and tillage. Crops such as field corn, soybeans, and cotton require conventional tillage practices on an annual basis. Annual cropping systems are generally dominated by annual weed species. Annual weeds in these cropping systems have an amount of genetic turn-over on a larger number of individuals that are routinely exposed to the selection pressure (herbicide mode-of-action) of regular herbicide use (Table 3).
| Weed variable | Potential for herbicide resistance |
|
Life cycle |
More common in annual weeds than perennial weeds due to greater amount of genetic turnover, increasing selection pressure. |
|
Tillage system |
More common conventional cultivation (annual plowing and discing) than in a no-till system due to greater amount of genetic turnover. |
|
Herbicide mode-of-action |
More common when the same mode-of-action is repeatedly used, increaseing selection pressure. |
While poor weed control and herbicide reistance strongly resemble each other, they are very different. Yes, it is true that both can result in poor to no weed control, but that is where the similarities end. Therefore, it is important to determine if poor weed control is a result of herbicide resistance or some other cause. We should never assume that weeds that survive an herbicide application are resistant. Herbicide resistance is a process that happens over time (years). For example, the last two years you had sufficient weed control and this year your same herbicide application resulted in near zero weed control. At this point, we need to look at other reasons for poor weed control. Herbicide resistance is not like a light switch, ON or OFF. There are may reasons poor weed control may have been observed in a given year that are not related to herbicide reisistance (Table 4).
| Reason for poor weed control | Description |
|
Herbicide related |
- incorrect herbicide used |
|
Weed related |
- incorrect weed identification |
|
Application equipment related |
- improper sprayer calibration |
|
Environment conditions (less-than-ideal) related |
- too cold or hot |
There are many ways that we can approach the goal of reducing the likelihood of herbicide resistance developing in weed populations in New England. Best management practices related to pesticide stewardship are the best way to move towards this goal. Best management practices should focus on the good herbicide practices that provide consistent and effective weed control (Table 5).
| Herbicide practice variable | Practice goal |
|
Weed |
- correct weed identification |
|
Herbicide selection |
- best herbicide for target weed |
|
Application timing |
- best timing for most effective control |
|
Application equipment |
- best equipment for most effective control |
|
Environmental conditions less-than-ideal |
- too cold or hot |
|
Insufficient control |
- determine the reason for poor control |
In summary, not all poor or lack of weed control is due to herbicide resistance. Herbicide resistance is a significant issue for agriculture and horticulture. Currently, there are no known weed populations in New England that are resistant to a specific herbicide mode-of-action. However, just because herbicide resistance is not common in New England does not mean we should not be aware of it and dismiss our concerns about the issue. Instead, we should be working on adjusting our herbicide practices to reduce the likelihood of herbicide resistant weed populations developing in our region.
Randy Prostak, UMass Extension Weed Specialist
Trouble Maker of the Month
Fusarium Bulb Rot of Tulips
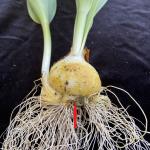
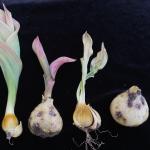
Fusarium bulb rot is one of the most common diseases of tulips. It is caused by Fusarium oxysporum f. sp. tulipae, a strain of F. oxysporum that is highly specific to tulips. This fungus is carried in infected bulbs, infected plant debris, and soil. Bulbs become infected in the field when the fungus penetrates tulip roots and travels into the basal plate.
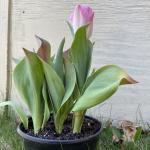
Symptoms of Fusarium bulb rot include yellowing or reddening of leaves from the tips down, aborted flower buds, stunting, wilting, and dieback. Sometimes a brownish substance is observed between the layers of the bulb, a condition called gummosis. Rot is typically centered around the basal plate but may appear anywhere on the bulb. Bulbs may be shrunken or feel lighter than normal. Rotting bulbs may smell sour. Roots may be rotted or absent. White or pinkish fungal growth may be observed, most often on the basal plate.
Fusarium oxysporum f. sp. tulipae produces large amounts of ethylene, which contributes to symptom development. In this way, presence of a bulb infected with this fungus can have an effect on uninfected bulbs close by, and apparently healthy bulbs near infected bulb may also produce plants that exhibit symptoms. Ethylene also promotes Fusarium infection by preventing the bulbs from producing the antifungal compound tulipaline.
Management: Fusarium diseases are best controlled through cultural practices and sanitation. Inspect bulbs carefully prior to planting and discard any that are shrunken, light in weight, or show symptoms of rot. Avoid overwatering and over fertilizing. Maintain soil pH in the range of 6.0-7.0 for optimum growth of tulips. Provide good drainage and/or plant in raised beds to reduce disease development. Do not plant new tulip bulbs in areas known to be infected.
Tulip cultivars vary widely in susceptibility to infection by Fusarium and sensitivity to ethylene: for example, many of the Darwin hybrids are particularly susceptible, while some cultivars of Tulipa gesneriana are among the more resistant. For information on specific tulip cultivars, consult your supplier and choose resistant cultivars if they are available.
Angela Madeiras, UMass Extension Plant Pathologist
Q&A
Q. I have been receiving offers and seeing advertisements for services to spray for ticks and mosquitoes. Is this something to consider and is it safe?
A. Perimeter yard sprays are recommended as part of a three phase plan: Protect Yourself, Protect Your Pet and Protect Your Yard. I tell people not to depend on a yard spray as their only effort. Wearing permethrin treated clothing/footwear should be a front-burner tactic; a yard spray is a way to further reduce exposure risk.
As far as yard spraying, this is something you can easily do yourself with a hose-end sprayer available at any garden center. Check out our video on yard spraying, as well as other resources about ticks, at capecod.gov/ticks. When contracting a service, there are key questions to ask about what, where and when to spray.
- What? The products should contain the active ingredients bifenthrin or permethrin. These have very low mammalian toxicity and, once they contact leaf litter or soil, they are immobilized, so there is no potential to leach and they are degraded by soil microbes. All Natural products that contain botanical oils like rosemary or cedar are NOT recommended. Research has demonstrated them to be completely ineffective.
- Where? Only the perimeter of the yard where there is shade and leaf litter under shrubs and trees. If a service offers to treat the entire yard, they really do not understand ticks.
- When? Mid to late May and mid to late June covers the window when nymph stage deer ticks are out. I also recommend a third spray around mid-October when the next generation of adult stage ticks emerge.
A major study is underway to determine how effective perimeter yard sprays are by The New England Center of Excellence in Vector-Borne Diseases. If you are interested in participating, please visit https://www.newvec.org/itch to complete their survey.
Larry Dapsis, Deer Tick Project Coordinator – Entomologist, Cape Cod Cooperative Extension
Garden Clippings Tips of the Month
May is the month to . . . .
-
Leave the foliage of spring flowering bulbs like daffodil, hyacinth, tulip and others until the foliage yellows. Premature removal of the foliage will reduce overall photosynthesis and food production that the bulbs need to remain vigorous and continue to bloom.
-
Direct seed cool season crops. May is a good time to sow beets, carrots, greens, lettuces and radishes. For transplants grown indoors or in a greenhouse, acclimate or harden off before planting. Hardening off can be done by providing slight water stress, reducing fertilization and exposing plants slowly to outdoor conditions over several days.
-
Warm season crops like cucumber, eggplant, melon, pepper, squash and tomato can be planted when soil temperatures reach 60 oF. Watch the forecast and plant ahead of several favorable days. Avoid planting too early and exposing plants to cold conditions that may result in stunting and delayed growth.
-
Mulch garden beds. Bark mulch, chopped leaves, leaves, pine needles, straw and wood chips all make decent organic mulches. When mulching, mulch to a depth of 2-4 inches over the root zone and avoid piling mulches at the base of shrub's stems and trees (volcano mulching). Mulches help prevent evaporative loss of soil moisture, moderate root zone temperature, and over time will break down and contribute to soil organic matter. Mulches applied in spring will reduce occurrence of summer annual weeds. Make sure perennial weeds are controlled before mulching.
-
Keep turf vigorous. Vigorous turf will be better able to handle the stress of summer, outcompete weeds and reduce the impact of some pests. Mow using the 1/3 rule: no more than 1/3 of grass shoots should be removed during mowing. Leave grass clippings on the lawn; lawn clippings can be an important source of nutrients and contribute to organic matter.
-
Spring flowering trees and shrubs like azalea, forsythia, lilac and serviceberry that were not pruned during the dormant season should be pruned immediately following bloom.
-
The end of May is a good time to have houseplants take up residence outside. Gradually expose houseplants to the outdoors and avoid immediate direct sun that can result in leaf burn. Now is also a good time to re-pot houseplants that have outgrown their current pot or become root bound.
-
Get a soil test! The Routine Soil Analysis from the UMass Soil and Plant Nutrient Testing Lab tests for pH, major and micro nutrients, lead, and cation exchange capacity, and provides crop-specific lime and nutrient recommendations. For an order form and info on how to take and send a sample, go to soiltest.umass.edu.
Russell Norton, Horticulturist, Cape Cod Cooperative Extension
Reviewing the Practice of Urban Tree Planting
Tree Handling, Selection & Installation
Whether it’s the installation of a single tree on a residential landscape or the planting of a million trees across an urban expanse, interest in community beautification abounds and often includes the planting of trees. And whether it is single tree that is being transplanted from one location to another on the same site, or the mass transportation of many trees from a commercial nursery, there are several best practices to keep in mind. Here we will review some of them, with the hope that we can encourage the successful installation and establishment of urban trees.
Site evaluation
 It is more efficient to select a tree (see Fig. 1) in accordance with a site’s capacity than to try to alter existing site conditions to match a tree’s requirements; thus, a site evaluation should be carried out before a tree planting takes place. A site evaluation can provide many important details including an understanding regarding available growing space and details pertaining to soil drainage, pH, and permeability. According to research, urban soils are generally more compacted than native, undisturbed soils. This is generally expressed through a bulk density (e.g., soil strength or “Db”) that is typically higher (0.5 mg/cm3) than non-urban soils, often due to a number of factors including construction-related activities (Day & Bassuk 1994). One way of addressing compaction before planting is to amend the area that is around the location where a tree is going to be planted, extending beyond the planting hole. Watson & Himelick (2013) suggest amending a volume of 10% compost to restore soil structure and alleviate compaction. According to Cornell University’s Urban Horticulture Institute (UHI), the more extreme soil-related challenges found in urban environments may require amending with up to 1 part compost to 2 parts soil to restore soil structure and address compaction.
Transplanting
One strategy that may help improve the chances of transplanting a tree is employing the practice of root pruning. The act of root pruning includes strategically-placed cuts to roots prior to digging to encourage the proliferation of more numerous, smaller roots that may aid recovery at the time the tree is transplanted to its new site. This should be done early enough so that vigor is not reduced at digging, but not so late that regenerated roots have spread widely at the time of harvest. This may include, for example, root pruning a tree in September in preparation for a transplanting the following fall.
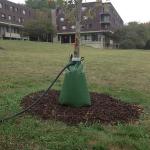
An advantage to a fall transplanting is that supplemental hydration may not be quite as crucial as the cooler autumn temperatures may potentially give the tree additional time to become established before the hot summer months of the following year. One disadvantage, however, is that desiccation may occur over the winter months if roots do not become established – a factor that is especially critical in relation to coniferous trees that maintain their foliage year-round. A spring planting effort before trees break dormancy generally eliminates the worry associated with cold winter temperatures, like freezing and thawing of the soil that may actually displace plants from the ground. Whatever the time of year, care should be used to minimize root-related injury, and water should be made generously available (Fig. 2) to help the tree acclimate to its new environment and its reduced root system (Fig. 3).
Regarding the actual digging of the tree itself, hand digging may be employed to move smaller trees and was also employed to dig large trees in the past (Fig. 4). Though time-consuming, hand digging allows for careful custom-removal of soil in relation to the root system of the tree in question. A mechanized tree spade is a contemporary tool used to move trees (Fig. 5). If trees don’t need to be moved far, it is not uncommon to see a tree spade carrying a tree from its origin to its new planting site in one trip. This tool, and an expeditious transplant, can help to assure a higher success rate. Of course, tree spades have their limitations, as they are costly and may not be able to access the site where the tree is located if it is in a tight spot or on a slope. Arborists may also use compressed air to remove the soil from the base of an established tree and then a combination of pruning and heavy equipment (i.e., forklift) to dig the tree free from its current site and move it to its new location.
Exposing roots offers many advantages including the opportunity to correct deformities like girdling roots and to remove soil which may greatly decrease the weight associated with moving a tree. It is important to note, however that roots that are exposed to air begin to desiccate quickly and become “walled off” as part of a process known as suberization (Fig.6). This process involves the production of oils that resist water movement and loss within the plant roots.
Avoiding Deep Planting
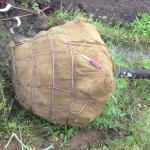
If a tree that is being planted is coming from a nursery, it is important to keep in mind that some of these trees may feature excessive soil (more than 3”) covering their flare and roots. It is at the critical juncture of installation that excess soil should be identified and corrected for to preclude its translation into the landscape; in fact, research by Wells and colleagues (2006) has availed that over 90% of newly installed trees inspected featured excessive soil covering the flare and main roots (Fig. 7). This issue may be especially prevalent with trees that are field grown, dug, and wrapped in burlap (B&B).
Though detection of all root imperfections may not be practical, a full visual inspection of the root system of a very select number (5% – 20%) of trees prior to planting for circling, girdling, or other undesirable root-related imperfections should occur. Interest in using trees that are grown via other production methods that include flexible containerized systems known as grow bags (in-ground fabric, IGF) or bare root (BR) continues, yet B&B trees continue to comprise a substantial portion of the trees that are planted, as species availability may be more abundant and roots remain protected in soil (Fig. 9).
Consequences of deep planting and urban trees are only emerging in the literature, but slow growth, increased chance of infestation by insect or disease pests, chlorosis, poor flower production, and early mortality are strongly suspected to be among the many results. Where possible, the new planting hole should be dug wide (at least 2x the width of the diameter of the root mass), so that its depth correlates with the depth of the root collar. This may be corroborated with the tree itself by taking the time to locate 2 or 3 main roots and the root flare before installation. It is especially important to emphasize that the root collar should not be buried as a result of a planting effort. Glazing is another important factor to be aware of and the sides of the planting hole should be scarified if it is suspected that roots may have trouble penetrating into the new soil.
Though some of the literature indicates that tree planters need only remove the upper portion of the wire basket of a B&B tree, many practitioners opt to remove the entire wire basket, expressing both concern that this metal material will most assuredly never break down and anecdotal observations that the remaining metal may pose a problem in the future. When back filling with existing or amended soil, stopping once or twice to water the tree (a process known as “mudding the tree in”) is a good practice that may help eliminate airpockets, add moisture, and facilitate settling the tree in place. Light tamping is acceptable, but wholesale stomping can damage the tree roots and is simply not necessary.
Appropriate After-care
Once the tree is successfully installed and 2-3” of mulch have been applied around the tree at a distance of three times the diameter of the root ball, check to ensure that the stem is free of contact from the mulch. A soil ring at the edge of the root ball may be created and left visible to help hold water in place over the first season. Following this, regular watering throughout the first season of growth should ensue. Adequate water is typically considered the key limiting factor to successful tree establishment. With long-term concerns in mind, it is important to select tree species that are tolerant of dry periods and other stressful conditions associated with being planted in the urban environment.
Over the years, arborists have widely reported that they have all too regularly encountered girdling and other problems on landscape and urban trees due to guying material being left in place from staking. The staking and guying of a tree is a practice that should be carried out in a very judicious manner that must be removed after a season or two.
A common question regarding new tree installations often relates to the use of fertilizers and the applications of mycorrhizal soil inoculants. Generally speaking, unless a soil test identifies a significant nutrient deficiency or if there is some sort of visual cue (e.g., nearby specimens denote a nutrient-related problem), fertilizing at the time of planting is typically not necessary in the Northeast. Mycorrhizal inoculants are also typically not warranted and, according to the literature, their practical benefits have been quite limited. Pruning during planting should occur in a judicious way where only defective, crossing or diseased branches should be removed.
 The origin of a tree to be selected for planting is important. While trees may be produced here in the Northeast under local climatic conditions, large quantities of trees are often purchased from nurseries located in more southerly states, the Mid-West, and the Pacific Northwest. In addition to potential challenges related to adapting to the Northeast climate, information pertaining to seed source (i.e., where the tree specifically came from) and root stock may be limited or unavailable. According to the USDA Plant Hardiness map, Massachusetts features a climate that ranges from a relatively moderate zone 7b to a significantly colder zone 5a (Fig. 10). Utilizing trees grown under these local conditions may minimize plant adaptation time and increase the chances of success pertaining to achieving a healthy urban tree planting.
For more information:
The Practical Science of Planting Trees, G.W. Watson and E.B. Himelick (2013, International Society of Arboriculture, Champaign, IL. 250 pp. https://wwv.isa-arbor.com/store/product/396
Day, S. D., and N.L. Bassuk. 1994. A review of the effects of soil compaction and amelioration treatments on landscape trees. Journal of Arboriculture 20(1):9–17.
Wells, C., K. Townsend, J. Caldwell, D. Ham, E.T. Smiley and M. Sherwood. 2006. Effects of planting depth on landscape tree survival and girdling root formation. Arboriculture & Urban Forestry 32(6):305-311.
Richard W. Harper, Ph.D., Extension Associate Professor of Urban & Community Forestry, Department of Environmental Conservation, UMass Amherst
Upcoming Events
For details and registration options for these upcoming events, go to the UMass Extension Landscape, Nursery, and Urban Forestry Program Upcoming Events Page.
- 6/27/23 - Insects and Ornamentals Walkabout, New England Botanic Garden at Tower Hill, Boylston MA, 2:00-4:00 pm
Pesticide Exam Preparation and Recertification Courses
These workshops are held virtually. Contact Natalia Clifton at nclifton@umass.edu or go to https://www.umass.edu/pested for more info.
Additional Resources
For detailed reports on growing conditions and pest activity – Check out the Landscape Message
For professional turf managers - Check out our Turf Management Updates
For commercial growers of greenhouse crops and flowers - Check out the New England Greenhouse Update website
For home gardeners and garden retailers - Check out our home lawn and garden resources
TickTalk webinars - To view recordings of past webinars in this series, go to: https://ag.umass.edu/landscape/education-events/ticktalk-with-tickreport-webinars
Diagnostic Services
Landscape and Turf Problem Diagnostics - The UMass Plant Diagnostic Lab is accepting plant disease, insect pest and invasive plant/weed samples. By mail is preferred, but clients who would like to hand-deliver samples may do so by leaving them in the bin marked "Diagnostic Lab Samples" near the back door of French Hall. The lab serves commercial landscape contractors, turf managers, arborists, nurseries and other green industry professionals. It provides woody plant and turf disease analysis, woody plant and turf insect identification, turfgrass identification, weed identification, and offers a report of pest management strategies that are research based, economically sound and environmentally appropriate for the situation. Accurate diagnosis for a turf or landscape problem can often eliminate or reduce the need for pesticide use. See our website for instructions on sample submission and for a sample submission form at http://ag.umass.edu/diagnostics.
Soil and Plant Nutrient Testing - The lab is accepting orders for Routine Soil Analysis (including optional Organic Matter, Soluble Salts, and Nitrate testing), Particle Size Analysis, Pre-Sidedress Nitrate (PSNT), Total Sorbed Metals, and Soilless Media (no other types of soil analyses available at this time). Testing services are available to all. The lab provides test results and recommendations that lead to the wise and economical use of soils and soil amendments. For updates and order forms, visit the UMass Soil and Plant Nutrient Testing Laboratory web site.
Tick Testing - The UMass Center for Agriculture, Food, and the Environment provides a list of potential tick identification and testing options at: https://ag.umass.edu/resources/tick-testing-resources.
